
Throughout the first national lockdown we posted ideas for getting active and enjoying the natural environment from you own garden. We will leave all the backdated ideas and activities on here for the time being.
We would love to see pictures of how you get on with these ideas – please feel free to tag us in your photos on Facebook or message/email and we’ll feature them on our Facebook page.
Day 48 – Forest School at Home
Stick person
For this you will need 4 sticks and some lengths of wool.
Step 1 –
Lay your sticks out in the shape of your person and trim any sticks you need to.
We started with the legs, tying them together with a square lashing (which you can find back on Forest School at Home Day 1).
When you have tied them together, put them on your body stick and start wrapping the wool around both the legs and body.
Keep wrapping the wool and make your way down one leg to make the trouser leg. Wrap your way back up again and then down the other leg, back up and tie off the wool.
Step 2 –
Do exactly the same process with the arms stick. Tie the arm stick to the body with a square lashing and work the wool along (as with the legs) to make the t-shirt.
Step 3 –
We sliced off the bark from the stick (this can be carefully done with a vegetable peeler) and drew on a face.
We finished our person off with a few wraps of wool for a hat.
It would be great to see your stick people, so post up a picture if you give it a go.
We’ll be back next Thursday with another Forest School at Home.


Day 47 – Forest School at Home
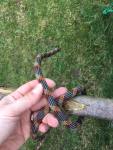
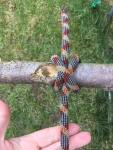
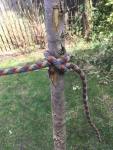
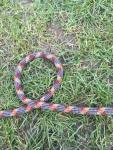
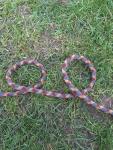
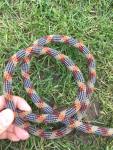
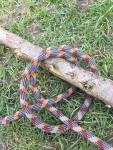
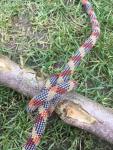
Sheet bend knot
A great knot for tying to ropes together, especially if they are of different thickness.
Step 1-
Make a loop in the thicker rope and pass the thinner rope through it.
Step 2-
Take the thin rope around the thicker rope and pass it under itself.


Day 46 – Forest School at Home
Sundial
A simple way to make your own sundial using a stick and some stones.
Poke your stick in the ground in a spot that will get the sun all day.
Each hour place a stick in the shadow of the stick.


Day 45 – Forest School at Home
Ice art
A good activity for cold winter, but as long as you have a freezer we can do it this time of year.
Pour some water into a bowl or deep plate.
Create a design of your choice in the water using natural materials from your garden.
Put both ends of a loop of string in the water, leaving the loop out to use as a hanger.
Usually in winter we would now leave it out overnight to freeze, however this time of year just put it in the freezer.
When it has frozen, take it out and hang it up where the sunlight can shine through it showing off your design.


Day 44 – Forest School at Home
Stick star
All you need is five straight(ish) sticks and some string.
Cut your sticks to about the same length and lay out in the shape of a star.
Work your way around the five points lashing them together with your string.
On one of the points leave a longer end on the string to use as a hangar.


Day 43 – Forest School at Home
Intro to Navigation Week
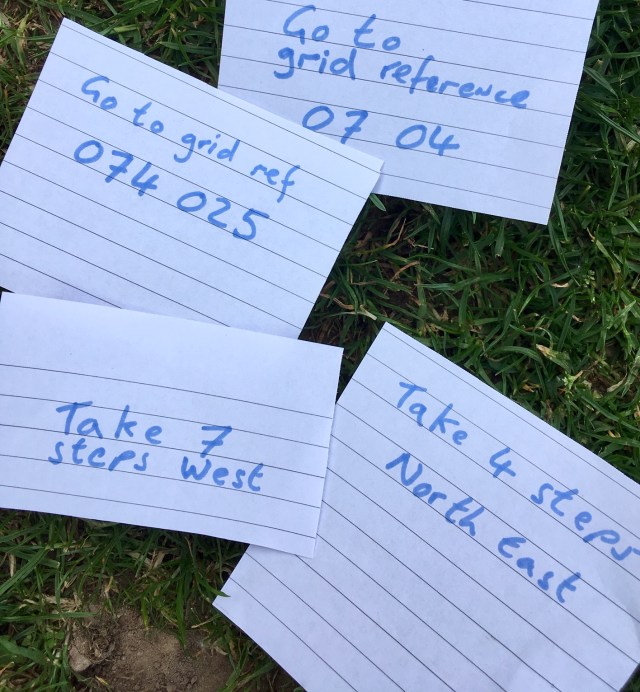
Treasure Hunt
No new topics for today – instead we are going to look at an activity to help put the week’s learning into practice.
To take part in this activity you will need a map of your own garden, which we did on Tuesday (day 40).
There are two options for this activity – either you can create a treasure hunt for your child to follow or you can give them the task of creating a treasure hunt for you.
Depending on the level your child is working at you can either put an X on the map or if your child has been able to put a grid on the map, give them a grid reference.

At this location leave a note giving instructions to the next note – this can either be another grid reference or if you want to bring in compass work, you could give directions such as ‘walk 5 paces South.’
Putting in a variety of instructions, alternating between compass and grid references will help to encourage different skills.
You can make the course as long or short as you like and if you are feeling generous, you could leave a prize at the end for completing the last instruction.
As always, if you struggle with any of this or would like any advice, please get in touch through Facebook messenger or email us direct at mountainleopardtraining@gmail.com.
It would also be great to see some photos of how you get on.
Day 42 – Forest School at Home
Intro to Navigation Week
Intro to contour lines.
A little more advanced for today’s learning – we are looking at what contour lines are and what they tell you.
Luckily there is a great bit of craft you can do to help learn, which we will come onto later.
When looking at a map you will notice many red/brownish lines all over the map. These are called contour lines and show changes in height. Each line shows either and increase or decrease in height (on Ordnance Survey maps this is usually 5 or 10 meters height change, on Harvey maps it is often 15 meters – there will be a key or legend on the map which will give you this information). For the basics that we are covering today, we will simply look at interpreting the lines and not worrying about the numbers.
A significant part of contour lines to consider is the distance between them, the closer they are together the steeper the hill.
Practical –
A great way to understand contours is to have a play around with some thick material (thick cardboard will work fine).
Cut out a series of shapes and go around the edges with a marker pen (these lines will be your contour lines).
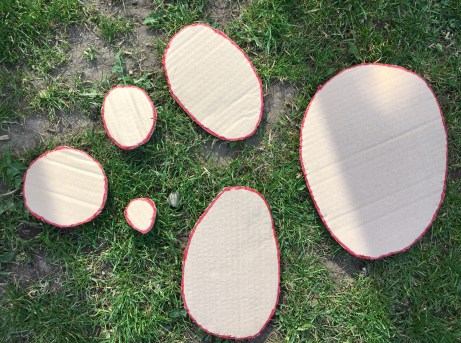
Place them on a flat surface and stack them in various positions.
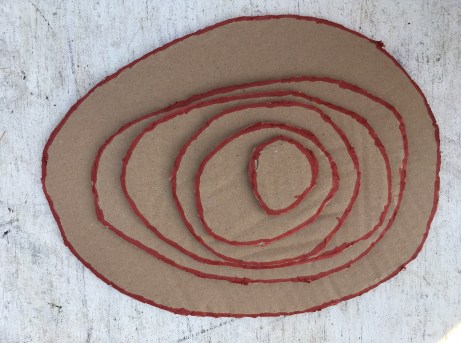
Now when you look at them from above (like a map), you will see the shape of your contour lines which you have created. From the side you will be able to see the shape of hill that those contour lines would represent.
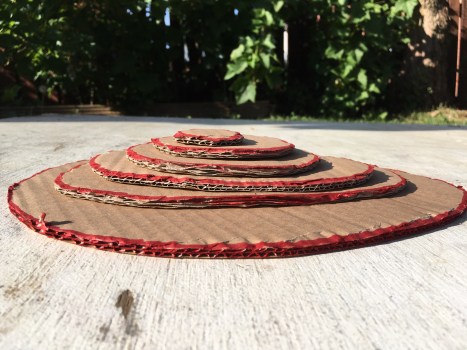
Try putting the lines close together and look from the side to see how this makes for a very steep slope, also try putting the lines far apart and looking from the side you will see that this will make the slope much less steep.

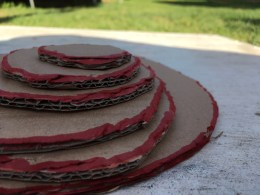

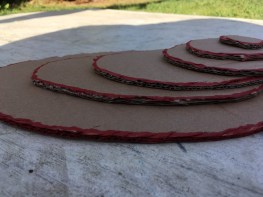
Have a play around with the shapes and see what shape hills you can come up with.


As always, if you struggle with any of this or would like any advice, please get in touch through Facebook messenger or email us direct at mountainleopardtraining@gmail.com.
It would also be great to see some photos of how you get on.
Day 41 – Forest School at Home
Intro to Navigation Week
Intro to Grid References
Today we are looking at introducing grid references – this is an integral part of map reading, however can be a little tricky to get your head around at first.
We are going to start simple with stage 1 and look at something a bit more advanced for stage 2.
Stage 1 –
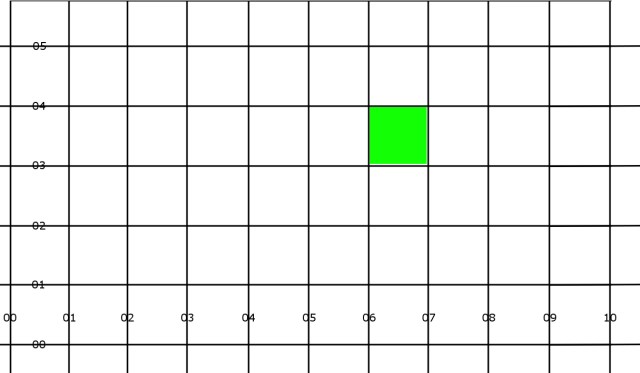
Most maps have a grid of squares overlaid on top of them as a way to appoint certain reference points to any given location. This can be essential when planning a route, looking up a certain location or describing a location to someone else.
Each line of the grid will have it’s own number – the numbers will increase as you go either left to right or bottom to top.
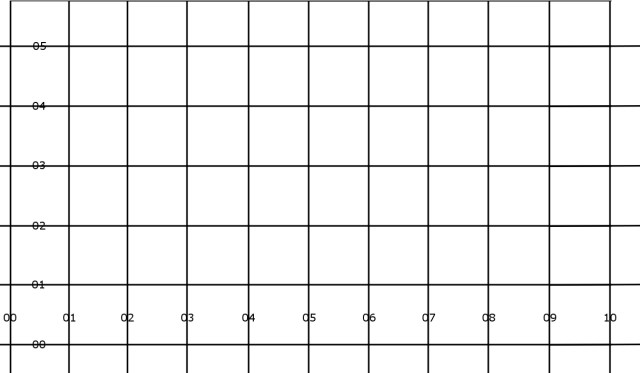
As a basic way to identify or describe a location on the map you will need to use the corresponding numbers, starting with the horizontal line then the vertical (a good term to use in order to remember this sequence is ‘along the corridor then up the stairs’).
For example the picture below highlights one square – to find the grid reference for this square we go along the corridor (horizontal line from left to right) to line 06, then up the stairs (the vertical line from bottom to top) to line 03. Therefore the grid reference for the green square is 06 02.
A game you could play to help learn this system is a simplified version of the board game battleships. Two players each draw the same grid on a piece of paper each. Then each player (without the other seeing) mars three different squares. The other player then has to guess grid references to try and find the ones you have marked.
Stage 2 –
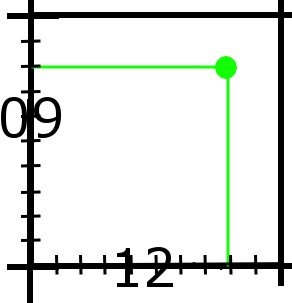
To advance with grid references, you need to add two extra numbers, to make it a six figure grid refernce.
Although not shown on maps, the gap between each is line is actually broken up into 10 sections – for example the line 09 is actually 090 and continues with 091 then 092, 093,094,095,196,097, 098, 099 then hit the next line at 100 (or the line 10 as it would appear on the map).
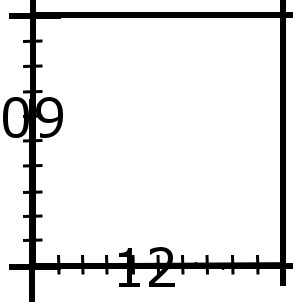
The process for finding a grid reference is exactly the same, simply adding a further number on to each line. For example the green dot on this grid is found in square 09 12.
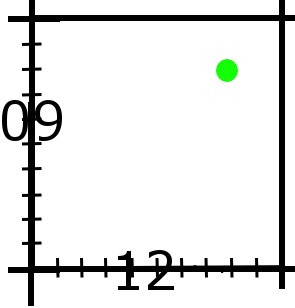
When adding in the extra numbers – (counting from left to right – along the corridor) 098 then (counting from bottom to top – up the stairs) 128. Therefore the six figure grid reference is 098 128.
Bit of a tricky one today, so as always, if you struggle with any of this or would like any advice, please get in touch through Facebook messenger or email us direct at mountainleopardtraining@gmail.com.
Day 40 – Forest School at Home
Intro to Navigation Week
Introduction to maps.
Today we are going to look at introducing children to the concept of maps.
Today we have broken this down into three different sections of increasing difficulty – it is worth reading through to see which would be most suitable for the children you are working with.
Before starting on the activities below, discuss what a map is – an overhead plan of an area.
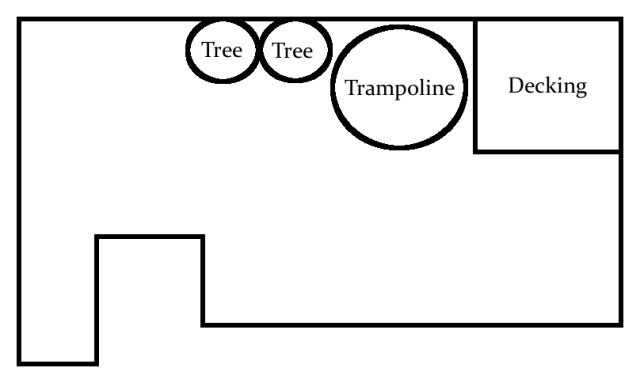
Level 1 –
Go out into your garden or outdoor space with a pen and a piece of paper.
Get your child to draw a map of your garden trying to get things in the correct place and thinking about sizes (i.e. comparing sizes of the items you are drawing – if your tree is bigger than your shed for example, make sure that is the case on your map).
Try to envision what your garden looks like from above and draw it as such – don’t draw a tree from the side view, try and think what it would look like looking down on it.
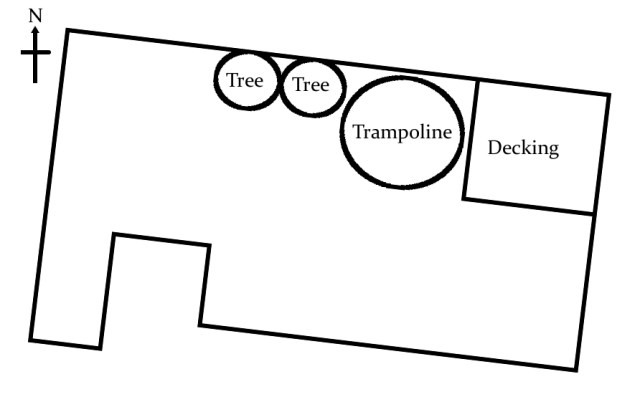
Level 2 –
As with Level 1, however we are starting to look orientating the map correctly.
Maps are drawn so that North is always at the top of the map.
Go out into your garden with your pen and paper and draw a map of your garden as we talked about in level one, however this time use your compass (which we looked at yesterday) to see which direction North is. When you have worked out which way North is, draw your map so that everything is lined up correctly with North (see picture 2).
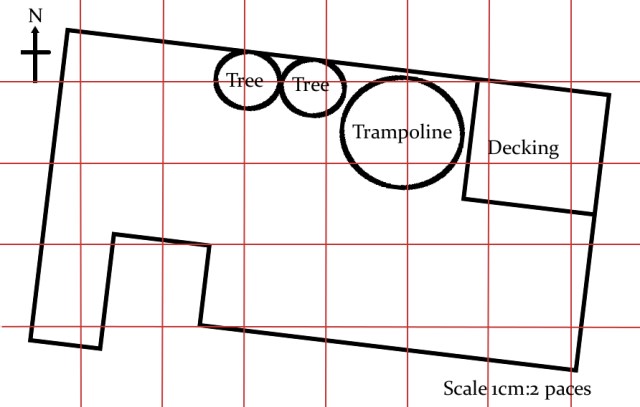
Level 3 –
With this activity we are creating a map as we did in level 1, with the correct orientation as in level 2, however at this level we are starting to look at scale.
Maps are drawn to a certain scale – for example many Ordnance Survey maps are draw to a scale of 1:25000, meaning that 1cm on the map represents 25000cm on the ground.
To start to introduce this concept you could draw your map to a scale.
If you want to be really precise you could measure your garden in meters, however we just used paces to keep it simple.
You can use whatever scale you wish, but on our example map we used a scale of 1 cm to 2 paces – therefore if we walked the length of our garden and we measured it as 20 paces, on our map we would draw it as 10cm.
As always, if you struggle with any of this or would like any advice, please get in touch through Facebook messenger or email us direct at mountainleopardtraining@gmail.com.
It would also be great to see some photos of how you get on.
Day 39 – Forest School at Home
Intro to navigation week
We are taking a break from traditional Forest School this week to look at a five part intro to navigation.
These posts will primarily be aimed at parents/carers in order to assist in introducing these concepts to children (however if your child is older, you may wish to just let them get on with it themselves).
Each day we will give a basic introduction to the topic and then something more advanced if you wish to take it further.
Intro to compass work
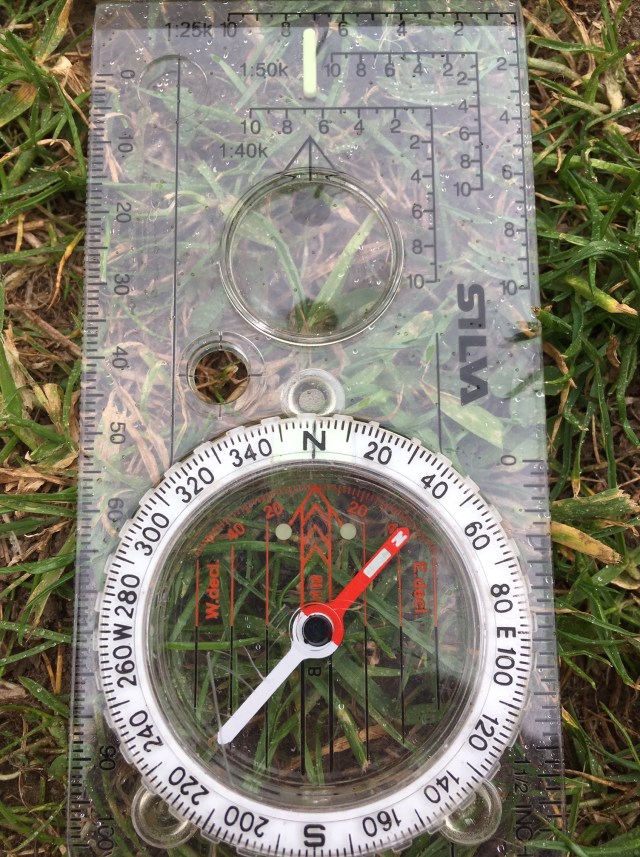
Today we are going to look at introducing children to a compass.
For this it you will require a compass to work with – if you do not have one there are smartphone apps you can find for free which will be perfectly adequate for this introduction. At this stage, the more basic the compass the better – extra features at this point can be quite confusing.
Stage 1 –
If the child is unfamiliar with a compass or has not used one before, it is best to start very simple.
Let them have a play around with it, turning it and holding it in different directions. Hopefully they will see for themselves that the one consistent thing is that the red needle always points in the same direction regardless of which way the compass is facing. The red needle always points North, and from this you can start to introduce other directions.
Step 2 –
Learning the four main directions.
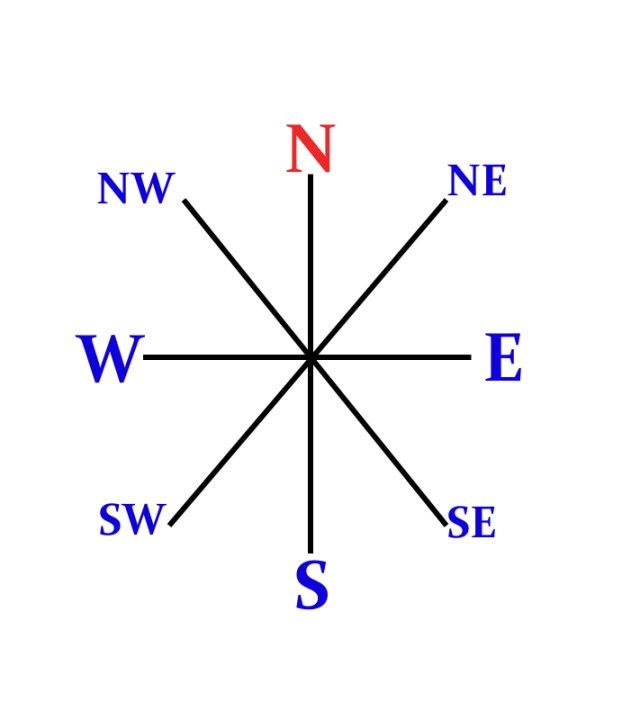
Many kids often struggle to remember what order the directions North, South, East and West go in (most commonly remembering which side East and West go on).
A good starting point for this is to draw a cross on a piece of paper and get them to label the four points. There are many of ways to remember the sequence, but one of the most common ways is through an easy to remember phrase. You can make up your own phrase based around one of your kids interests (perhaps a favourite TV program), however the one we often use is ‘Naughty Elephants Squirt Water’ – i.e. NESW – the sequence of North, East, South, West.

Putting learning into practice.
A few good exercises to help put this learning into action are as follows –
1 – take your child with their compass to different areas of your garden (and facing different directions) and ask them to identify which way is North.
2 – take your child with their compass to different areas of your garden and ask them to identify which direction certain garden features are. For example take them North of your door and then ask them to identify which direction the door is in, which they will hopefully identify as South.
3 – get your child to stand in the garden with their compass and play a game of ‘Simon Says’ using compass directions. For example – Simon says ‘take 3 steps East’ etc.
For all these activities it is key to get your child moving and facing in different directions – this will help them to recognise and rely on the consistency of the red North arrow.
Advanced learning.
If you would like to take this a step further, you can introduce further direction points such as North East, or South West etc.
This can be a little trickier to learn, so is best introduced after the child is comfortable with the basic NESW.
Repeating the activities mentioned earlier, but now including NE/SE/SW/NW, will help your child to put this new knowledge into practice.
As always, if you struggle with any of this or would like any advice, please get in touch through Facebook messenger or email us direct at mountainleopardtraining@gmail.com.
It would also be great to see some photos of how you get on.

Day 38 – Forest School at Home
Aunt Sally
A simple take on the traditional English game.
All you need to set it up is a long stick, stuck into the ground. Then you need something to balance on the top- we used a half coconut shell we had left over from a bird feeder.
Put a marker on the floor a few meters away as the throwing line.
The object of the game is then to throw a short stick underarm to try and knock the object off the stick.


Day 37 – Forest School at Home
Chalk animals
A simple but fun one for today, all you need is some chalk and some scavenged natural materials.
Find something natural from your garden, put it on a flat surface and use your chalk to turn it into an animal.


Day 36 – Forest School at Home
Wood weaving
For this craft you will need flat pieces of wood- these can be discs of cut branches or just any small off cuts of wood you have lying around.
There are two options for setting up your wood loom – you can either drill a series of holes in your wood or hammer in a series of small nails.
Obviously care should be taken when doing this and depending on the age of the child should be well supervised or done by an adult.
Then all you need to do is take some wool or string and start weaving patterns. If you are using holes, it is really helpful to have a small stick to help poke the wool through.
Try different amounts of holes/nails, alternating colours of wool and see what you can come up with.
If you give this a try, it would be great to see pictures of what you create


Day 35 – Forest School at Home
Leaf rubbing
All you need is a few leaves, some crayons and a piece of paper.
Put the leaf under the paper and rub your crayon lightly over the top.
Why not try a few different types of leaves and making some patterns.
Post up some pictures of your art work- it would be great to see what you come up with.


Day 34 – Forest School at Home
Tree identifying
A simple activity you can do while out on your daily exercise walk.
Look around at all the different types of tree you pass and take photos of their identifying features such as leaf shape, leaf positioning, bark colour and texture.
When you get home you can search the internet with your photo clues to try and identify the trees you have seen.
A google search for ‘tree identification’ will give you some good options and the Woodland Trust have a great free tree identifying app you can find in the App Store or on their website.


Day 33 – Forest School at Home
Double Fisherman’s Knot
A bit more tricky but a great way to join two ropes together.
Step 1 –
Lay the two ropes so they overlap.
Wrap one rope around the other and back on itself.
Wrap it around both ropes two full turns.
Poke the end through the knot (against the other rope) and pull tight.
Step 2 –
Repeat step one with the other rope.
Step 3 –
Once both knots are done pull both ropes away from each other so the knots but up against each other to complete the Double Fisherman’s knot.
Let us know how you get on and post some pictures.


Day 32 – Forest School at Home
Stick stack challenge
Chop a pile of sticks- they can be as long or short as you like, but the more sticks the better. Ours were about an inch long.
Take turns to build the highest tower in two minutes.
Mark off the height of your tower on a long stick and see if someone else can beat it.


Day 31 – Forest School at Home
Tree twins
Quick and easy one for today, which helps you to look a bit closer at the trees/plants in your garden.
Use a pen to colour a couple of the lines on the palm of your hand.
Now you need to look for your tree twin – find a branch or plant that matches the lines on your hand.
Let us know how you get on and post some pictures.


Day 30 – Forest School at Home
Giant snakes & ladders
An outdoor twist on the board game, we collected a bunch of long sticks and made a grid – you can make this as big or small as you like, depending on what sticks you have.
We then used small branches for ladders and old pieces of rope for snakes.
We used some of our painted stones for counters.
Let us know if you give this a try and post up some pictures.


Day 29 – Forest School at Home
Shadow art
All you need for this one is a bunch of leaves/natural materials an item to copy and the Sun.
Find somewhere flat and smooth to place your item- we used our outdoor table. Place your item (we used a dinosaur) in a position where it casts a good shadow.
All you need to do now is fill the shadow with natural materials such as torn up leaves, then when you remove your item you should have a great natural art picture.
Let us know how you get on and it would be great to see what pictures you create


Day 28 – Forest School at Home
Reef knot
A simple but useful knot today- a reef knot is great for attaching two ends of rope together.
Step 1-
Lay the left hand rope over the right and loop it round.
Step 2-
Do the same again but this time lay the right hand rope over the left and loop it round.
Pull tight and your done.
Let us know how you get on and post some pictures of your efforts.


Day 27 – Forest School at Home
Leaf & needle compass
Improvise a compass from a sewing needle.
What you need-
A sewing needle
A magnet (a fridge magnet is fine but the stronger the better)
A leaf
A tub of water
Take your needle and run the magnet along it from the eye to the point. You will need to do this several times, weaker magnets will need more.
Place it on your leaf and float it on the water.
The point of your needle should now point North.
Let us know how you get on and post some pictures.


Day 26 – Forest School at Home
Rock pile home
What you need-
A spade and a pile of rocks.
A simple task today that creates a great home for minibeasts in your garden.
Insects and other small creatures love to hide and live in small gaps and under rocks.
All you need to do for this one is find a space in your garden and dig a small shallow hole with your spade.
Fill the hole with rocks and pebbles of different sizes, creating loads of nooks and crannies which minibeasts will love.
Let us know how you get on and post some pictures on our Facebook page.


Day 25 – Forest School at Home
Bug hunt
Today we are searching for bugs in our back gardens.
You can find bugs pretty much anywhere – on leaves and plants, on walls, in the mud, under rocks.
This is a good time to get your hands dirty, dig in the mud, lift rocks and logs and basically crawl around looking for bugs in their natural environment.
We came across loads of different species – everything from worms and ants to millipedes and earwigs.
Please remember to always replace rocks/logs etc back where you found them to preserve the bugs habitat.
Let us know how you get on and what you find.


Day 24 – Forest School at Home
Nettle tea
Just one of many reasons nettles can be a great resource in the outdoors – nettle tea.
Step 1 –
Find some fresh nettles and harvest the leaves. A pair of gardening gloves are ideal for this to avoid getting stung.
You are trying to get the leaves with as little stem as you can- about a cup full is ideal.
Step 2 –
Put them in a pan of water and heat – ideally they want to be kept just below the boil for a few minutes.
Step 3 –
Pour the liquid through a strainer to pull out all the bits of nettle.
Drink.
While being very good for you, nettle tea is not to everyone’s taste. You can always sweeten it up with a spoon of sugar or honey.
Give it a go and let us know how you get on.


Day 23 – Forest School at Home
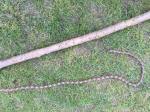
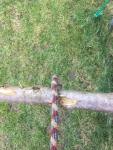
Timber Hitch
This is one of my favourite knots, super easy to learn, quick and easy to tie.
A great knot for attaching ropes to trees when setting up shelters etc.
Loop the rope around an object.
Loop the end of the rope around the main rope and back on itself – then wrap it around itself (a minimum of three times).
Pull tight.
The more you put pressure on the rope the more it will grip, therefore to release the knot simply release the pressure on the rope and it will be easy to untie.
Let us know how you get on and post some pictures of your knots on our Facebook page.


Day 22 – Forest School at Home
Dream Catchers
What you will need-
String and/or wool
A long bendable stick
Step 1 –
Find a long bendable stick, bend it into a circle and tie it together.
Step 2 –
Take a long piece of string or wool and tie one end to your stick.
Leave a small loop of string inside your hoop and then wrap it around the stick. Leave another loop and then wrap around the stick- keep going like this until you have gone all the way round the stick.
You then go around the circle again, but this time you thread the string through the loops you created on your first go round the stick.
When you have gone all the way round, go around again but this time threading through the loops created last time around.
Keep going round and around like this until you have a small circle in the middle of your dream catcher, then tie off the string.
Hopefully these instructions will make more sense when you look at the pictures.
Step 3 –
Decorate your dream catcher how ever you want.
We did things like hanging stones from string off the bottom and putting flowers and leaves on.
Let us know how you get on and post some pictures on our Twitter or Facebook pages.


Day 21 – Forest School at Home
Minibeast Pitfall Trap
What you need-
A clean container (jam jar, yoghurt pot etc)
A trowel
Four small stones and one large flat(ish) rock
You get all kinds of little creatures in your garden at night. This easy trap is a great way to get a closer look.
Step 1 –
It’s very important to check the weather forecast and only do this activity when it is going to be a dry night. If it is due to rain, the trap will fill with water and drown any insects caught inside.
All our activities are to interact with nature, not harm it.
Step 2 –
Dig a small hole in your garden, just big enough for your container.
Place it in so that the top is level with the ground. Sprinkle a small amount of dirt/leaves in the bottom and pack around the top of the container with dirt so that there is no gaps to the surrounding surface.
Step 3 –
Prop the large flat stone over the top of the container using the four small stones as legs, making sure there is enough gap for creatures to fit through.
Step 4 –
Leave it over night and check it in the morning.
We tipped it out onto a white sheet of paper to make it easier to see what was in it.
Step 5 –
Make sure you then remove the trap. If you leave it in and forget about it, insects will fall in and not be able to get out.
We managed to find a millipede, two woodlice and an ant.
Have a go and let us know how you get on and what you find.


Day 20 – Forest School at Home
Bird watching
A simple one for today –
all you need to do is spend sometime quietly in your garden and look out for different birds.
This is a great time of year to see lots of different species coming to your garden and flying overhead.
We’ve included some photos as a bit of a challenge for you to look out for –
the first picture is an easy one – Great Tit – these are extremely common in our garden and we get many of them on our birdfeeder every day.
the second picture is a Long Tailed Tit, no where near as common, however we do get them in our garden but this one will be trickier to spot.
the final picture is a Buzzard – you probably won’t see one land in your garden, but they are a very common bird of prey to see gliding overhead (one of the most common bird of pray to see in the UK)
It would be great to hear what species you spot – let us know on our Facebook or Twitter pages.


Day 19 – Forest School at Home
noughts and crosses
All you need to make your own noughts and crosses set are some stones and pens or paint.
You can design your two teams counters (stones) however you want – we went for coloured vs plain.
We made a board carved on an old tree stump, but you could easily mark one out from sticks or chalk one on the ground.
Let us know if you give it a go & post some pictures on our Facebook page.


Day 18 – Forest School at Home
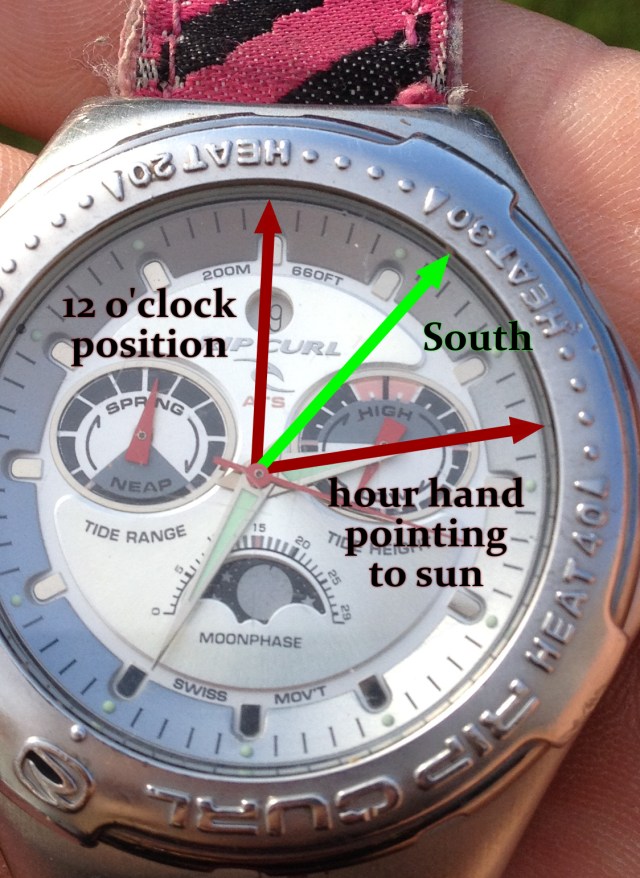
Finding North with a watch
A quick challenge for today and all you need is a watch or clock (must be analogue not digital).
With the sunny weather lately, it makes it a great time to try out a bit of navigation using only a watch.
All you need to do is hold the watch flat and point the hour hand at the sun.
Once you have your hour hand pointing at the sun, the line directly between your hour hand and the twelve o’clock position will point south and from this you can work out the direction of north which is the opposite direction.
It’s possible to do this from a digital watch – all you need to do is draw a watch face on a piece of paper (accurate to the time on your digital watch) then use the same method as above using your drawing instead of an analogue watch.
Let us know how you get on.
Day 17 – Forest School at Home
Weaving looms
What you need-
Sticks
Wool or string
If you can, find a stick with a ‘v’ shape in it to use as your frame.
You then tie off a piece of wool or string to the base of the v. Wind the wool around each branch of the v in turn all the way to the end of the stick and tie it off (try and make it reasonably tight as this will make weaving easier).
Now your loom is done start weaving between the string with whatever natural materials you can find in your garden.
If you want to take it a bit further, try experimenting with different shaped looms.
Let us know how you get on and post some pictures.


Day 16 – Forest School at Home
Garden colours
The idea behind today’s activity is to look closer at the variety of colours in your outdoor space.
We used some colour swatches for paint we picked up at the DIY store, but you could just as easily cut out different colours from magazines or flyers.
Spend some time in the garden hunting for matches to your colours- it’s amazing how many shades of the same colour you can find.
Let us know how you get on and post some pictures.


Day 15 – Forest School at Home
Rain art
All you do for this one is create stencils from natural materials you find in your garden.
The idea is to lay things out in a pattern on dry ground and when it rains, after a few minutes remove the materials and see your creation.
We couldn’t be bothered to wait for rain so we gently sprayed with a hose.
If you give it a go, let us know how you get on and post a picture of your art on our Facebook page.


Day 14 – Forest School at Home
Stick hoop game
What you need-
String and a bunch of sticks.
Step 1-
Make your ‘hoops’ – in this case we are going to use triangles, because they are easier to make.
Trim three sticks to a similar length – the size is up to you. The bigger you make the hoops, the easier the game will be.
Lay the sticks in a triangle and tie them together using the square lashing we learnt on Day 1.
Step 2 –
Stick a long stick in the ground to us as a target and you are ready to go.
Let us know how you get on and post some pictures on our Facebook page.


Day 13 – Forest School at Home
Shelters with home made pegs
What you need –
A tarp (if you have one, or you could use an old bed sheet/table cloth etc.)
A length of rope (length of washing line etc if you have no rope)
Some string or cord
Some sticks
A vegetable peeler
Step 1 –
Make your tent pegs.
Get one of your sticks and use the peeler to carefully sharpen one end. Do this carefully, kneeling down and holding the stick to your side, peeling away from you, keeping your finger out of the path of the peeler.
Do this for as many sticks as you think you will need to peg out your shelter – 4 – 6 is usually enough.
Step 2 –
Find a spot to put up your shelter – two trees is ideal, but use what you have (fence posts etc – or in our case a bolt on the wall).
Tie one end using a figure of 8 knot that we learned on Monday (Day 11).
Tie the other end using the clove hitch that we learned on Day 2 – this knot is ideal as it is easy to adjust and make your rope tighter.
Once you have done this, throw your tarp or sheet over like a tent.
Step 3 –
Peg out your shelter.
If you are using a tarp like we have, it will probably have loops or eyelets to tie string or cord to and peg out.
If this is the case use these loops to tie in to and peg out your shelter like a tent, using your home made pegs.
If you are using a sheet with no loops or eyelets, you will need a few small rocks or small objects. Wrap a rock in the edge of your sheet and use a clove hitch knot with some string to tie it in place – this can now be used as an attaching point to peg out your sheet (see photos).
As always, let us know how you get on and post some pictures on our Facebook page.


Day 12 – Forest School at Home
Apple bird feeders
What you will need –
An apple (or empty toilet roll if you have no apples)
Bird seed
Peanut butter or lard
A spoon
String
4 sticks
A bowl
Step 1 –
Scoop some peanut butter or lard into a bowl pour in some bird seed and mix together. If you have no peanut butter or lard, you can just use dry bird seed.
Step 2 –
Cut the apple in half and use the spoon to carefully scoop out some of the apple to create a bowl – careful not cut through the skin. (If you have no apples you can just use a empty toilet roll cut in half – see pictures)
Step 3 –
Carefully poke the four sticks through the half apple (about halfway down) so that they form a cross through the apple.
Step 4 –
Scoop your seed mixture into the hollow you have made in the apple half.
Step 5 –
Cut four lengths of string and tie one to each end of the sticks (a clove hitch, which we learnt the first week, is ideal for this).
Tie all four lengths together and it is ready to hang.
Let us know how you get on and post some pictures on our Facebook page.


Day 11 – Forest School at Home
Figure of Eight Knot
This knot is a little more tricky than the clove hitch we learned in the first week, but is great one to know.
As well as being one of the most common climbing knots, it also a great one for tying a rope to a fixed point – something we will use when we look at improvised shelters soon.
No written instructions for this one – follow the numbers on the pictures.
After tying the first ‘8’ shape, loop the rope around something before moving on to the next part, where you simply follow the rope back on it’s self.
When you are done, all the knot should be doubled up – if there is any single rope in there, something has gone wrong.
Any questions, let us know – as always let us know how you get on and post some pictures on our Facebook page.


Day 10 – Forest School at Home
Hammocks
What you need-
String, two equal length sticks.
Step 1-
Take a length of string and tie one end to one end of the stick and the other to the other end of the stick. I cut a small notch into the stick to hold the string in place, but this is optional.
The clove hitch we learnt on day 2 is ideal for this.
Then find somewhere to hang this from the stick- this will make the rest of the process easier than having it flat on the ground.
Step 2 –
Cut six or eight equal lengths of string- about an arms length will be fine. (You can use more lengths than eight if you want your hammock wider, but make sure there is an even number).
Tie one end of each of the strings to the stick with a small gap between them (see pictures) – again the clove hitch from day 2 is ideal.
Step 3 –
Take the two first strings, leave about four fingers worth of space and tie together. Then take the next two strings and do the same, continue for the whole row.
After you have done a row, start back at the beginning- this time miss the first string and tie the next two strings and continue.
Keep going in rows, alternating which string you start on.
Step 4-
When you are happy with the length of your hammock, tie the end of each string to another stick and cut off any excess.
Finally tie another string to the stick at each end to make a hanger for this stick (the same as we did for the first stick in step 1).
Hang it up, put a soft toy in it and hope it turns out better than ours did!
Let us know how you get on and post some pictures.


Day 9 – Forest School at Home
Tree Monsters
What you need-
Clay and some scavenged materials from your garden.
Fortunately? our front garden has a lot of clay in the soil, so we dug some of that up to use – if you don’t have any clay, you could just use mud.
You’ll need to squeeze the clay or mud a lot to get it soft and usable – you can also soak it in warm water to help.
Then find a tree or stick to put your clay/mud on and use your imagination to create a scary tree monster.
Use natural materials like twigs and leaves from your garden to decorate.
Let us know how you get on and post some pictures on our Facebook page.


Day 8 – Forest School at Home
Sound maps
What you need-
A piece of paper and a pen.
With many people locked down in their homes and less cars on the road, this makes conditions great for this activity and hearing some natural sounds.
Step 1- draw a small picture of yourself in the middle of your paper.
Step 2 – sit quietly in your garden for half an hour and listen carefully.
Every time you hear a noise (must hear it not just see it) draw it on your paper in the direction you can hear it. For example if you hear a bird to your left, draw a small picture of a bird on the left side of the paper. If you hear a car behind you, draw a car on the bottom of your paper.
If the sound is moving draw an arrow to show the direction of the sound.
At the end of the half hour you should have a map of the sounds in your garden.
Let us know how you get on and post a picture of your map on our Facebook page.


Day 7 – Forest School at home
Mini village
What you will need-
A bunch of scavenged natural materials from your garden.
Some toys or action figures.
No instructions for this one- just go where your imagination takes you.
The idea is to build a mini world for your toy, we went for a house with a leaf roof, ladder, fence etc- but it would be great to see what you come up with.
Let us know how you get on and post some pictures on our Facebook page.


Day 6 – Forest school at home
Picture frames
What you need-
4 sticks of similar length
A bunch of scavenged natural materials from your garden
String (optional)
Step 1 – make your picture frame.
You can either, simply lay out your four sticks on the ground in a square or you can fasten the corners together using the square lashing that we learned on Day 1.
Step two- use a variety of natural materials you can find in your garden to create pictures, patterns, story boards.
Let us know how you get on and post some pictures of your art on our Facebook page.


Day 5 – forest school at home
Rafts
What you need-
A tub of water
String
A bunch of natural materials from your garden
An action figure or small soft toy
No steps to this one as it’s all about figuring it out for yourself.
Using only natural materials and string, try and construct a raft capable of carrying your toy on your tub of water.
Keep trying when things don’t go well, try different designs, different size toys.
Crafts such as this are excellent activities to draw out a child’s creative side – the fact that the raft is unlikely to work the first time really aids the child’s resilience as they work through the problem, adapting the design and trying again.
Have a go and let us know how you did on our Facebook page.


Day 4 – forest school at home.
Cloth art.
What you will need-
A piece of thin light coloured or white cloth (we used an old pillow case)
A small hammer or wooden mallet (we used an old home made mallet)
A piece of wood to rest on.
Step one – look around your garden for leaves, plants, weeds, flower petals of a variety of colours.
Step two- put your piece of wood on the floor, put one of your foraged items (etc a leaf) on the wood and cover it with the cloth.
Step three- being careful not to get your fingers in the way, hit the cloth with your hammer/mallet where it covers your item. Hopefully hitting the item will crush it, releasing moisture and the pigment will colour your cloth.
Step four- try using different plants, mud etc to create a picture or pattern.
Try using different techniques to bash your item – other than hammering you can use different textured twigs as rollers.
Let us know how you get on and post some pictures on our Facebook page.


Day 3 – forest school at home.
Shelter building
It’s difficult in your own garden to find enough materials to build a full size shelter- so today we are going to build one for toys.
What you need-
Natural materials- leaves, twigs, branches or anything you can find in your garden.
A cup of water.
A soft toy or action figure.
There are a few different designs you can use, but it’s best to try and make whatever works for you.
You need to think about things such as wind proofing, waterproofing and making it stable and big enough for your toy.
Step one-
Build a frame from twigs long and thick enough to support the weight of the other materials you are going to pile on top.
At this stage, make sure it is big enough for your toy as it will be difficult to change this later.
Try and only natural materials you find in your garden, but you may need to tie some sticks together to hold your frame together.
Step 2-
You need to make the walls/roof of your shelter thick enough so that when you put leaves on for waterproofing they don’t just drop through.
To do this you need to build up the walls with thinner sticks, if can manage to weave some into a cross pattern it will help hold it together.
Step 3-
Water and wind proofing.
To do this simply place or weave leaves or grass onto the shelter – as thick as you can get it.
Step 4-
The test.
Put your toy into your shelter and pour the cup of water over the top.
See how well it works and if you’re toy stays dry.
Let us know how you get on and post your pictures on our Facebook page.


Day 2 – forest school at home
Clove Hitch
All you need is a length of rope or string and a stick. It’s easier to learn with thicker rope but can be done with anything- a shoe lace will be fine if you have nothing else.
Learn to tie a clove hitch knot.
Learning knots is not only a useful skill but also helps dexterity and builds resilience as kids work through the process, making mistakes and trying again.
The clove hitch is a great knot and will come in handy for some of our future crafts over the coming weeks.
There are two ways you can do this knot- attaching it directly to a stick or making the knot and poking a stick through it.
Method 1 –
Lay a piece of rope over the stick.
Loop it round the stick and over itself to make a cross.
Loop it round again and thread the end through the cross.
Pull tight.
Method 2 –
Hold the rope in two hands.
Make a loop by folding the rope in your right hand over the left.
Then make another loop in the same way further down the rope on the right.
Place the first loop over the second.
Poke a stick through both loops and pull it tight.
Let us know how you got on and post some pictures of your efforts on our Facebook page.
Any questions or advice – let us know.

Day 1 – Forest school at home-
As promised every few days we will post some ideas for outdoor crafts & activities you can do in your own garden- we need to isolate where possible, but time outside in your own garden can help with both physical and mental wellbeing.
Today we had a go at a great simple craft, all you need is –
A few sticks
Some scissors
Some lengths of wool (or you can use string if necessary, but wool makes it a bit more colourful).
As with all these crafts, this is only the way we have done it – so use this as a guide and feel free to vary it however you wish.
Step 1 – cut or snap some twigs into two short lengths. And remove all leaves.
Step 2 – tie the two pieces of wood together to form a cross.
You can do this however you like, but we have used a variety of square lashing.
If you want to use a square lashing, start by attaching one end of a piece of string or wool to one of the sticks using any type of knot you like (in the photos we have used a clove hitch).
Next loop the string over the top stick then under the bottom stick, then back over the top and continue altering sides. After a few of these wrap the string between the two sticks a couple of times to tighten the knot and tie it off to one of the sticks.
This ties the sticks nice and secure, but tie them together however works for you.
Step 3 – start to create your design.
Tie one end of a length of wool to one of the sticks, as close to the middle of the cross as possible. Then start to work the string around each of the four points of the cross in turn, starting in the middle and working out.
Again do this how you wish but try and do it in a consistent way – for example we did it in the photos by going over the stick and looping it round, over the next stick and loop it round, over the next stick and loop it round and so on.
Step 4 – get creative.
From this point on do it however you wish to create a nice pattern.
When one piece of wool runs out tie another on of a different colour and keep going.
You could alternate the way you loop the wool – i.e. you could start by going over the stick then loop it round then later start going under the stick and loop it round to vary the design.
Step 5 – when you are happy you have finished, tie off the end of the wool to one of the sticks, leaving enough tail to hang it up.
No two will look alike, and allowing kids to try and go as much as possible themselves boosts resilience and helps with dexterity.
Have a go, ask any questions and post a picture of your craft on our Facebook page.


